


Creating your own spice powders at home is not only a rewarding culinary endeavor but also allows you to enjoy the fresh and intense flavors of garlic, onion, and jalapeño in a convenient powdered form. With a simple dehydrating process and a coffee bean grinder, you can easily make homemade garlic powder, onion powder, and jalapeño powder. In this guide, we’ll walk you through the steps to create these flavorful powders from scratch.
Equipment and Ingredients:
- Fresh garlic cloves, onions, and jalapeño peppers
- Dehydrator or oven
- Coffee bean grinder
- Airtight containers for storage
Step 1: Preparing the Ingredients Start by selecting fresh, high-quality garlic cloves, onions, and jalapeño peppers. Peel the garlic cloves and onions, and remove the stems from the jalapeños. Ensure that the ingredients are clean and free from any dirt or blemishes.
Step 2: Dehydrating the Ingredients, using a dehydrator if you have a food dehydrator, it is the most efficient method for dehydrating your ingredients.
- Slice the garlic cloves, onions, and jalapeños into thin, uniform pieces. This will ensure consistent drying.
- Place the sliced ingredients on the dehydrator trays, leaving space between the pieces for air circulation.
- Set the dehydrator to a low temperature (around 125°F/52°C) and let it run for 8-12 hours. The drying time may vary depending on the thickness of the slices and the humidity in your environment. Check the ingredients periodically until they are dry and crisp.
You can always use an Oven If you don’t have a dehydrator, you can use your oven as an alternative.
- Preheat your oven to its lowest temperature (usually around 170°F/77°C).
- Spread the sliced garlic cloves, onions, and jalapeños on a baking sheet lined with parchment paper, ensuring they are evenly spaced.
- Place the baking sheet in the oven, propping the oven door open slightly to allow moisture to escape. This will help in the drying process.
- Leave the ingredients in the oven for 4-6 hours, checking periodically until they are thoroughly dried and crisp.
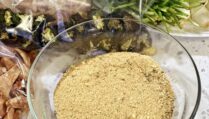
Step 3: Grinding the Dried Ingredients Once the garlic cloves, onions, and jalapeños are completely dehydrated, it’s time to transform them into powder.
- Allow the dried ingredients to cool down before grinding to prevent condensation.
- Transfer the dried pieces to a coffee bean grinder, filling it up to about two-thirds of its capacity. It’s recommended to grind each ingredient separately to maintain their distinct flavors.
- Pulse the grinder in short bursts until you achieve a fine, powdery consistency. You may need to shake or tap the grinder occasionally to ensure even grinding.
- Once ground, transfer the powder to a clean, airtight container. Repeat the process with the remaining dried ingredients.
Step 4: Storing the Powders To preserve the freshness and flavor of your homemade spice powders, proper storage is essential.
- Use airtight containers, preferably glass jars or metal tins, to store the powders.
- Label each container with the name of the powder and the date of preparation.
- Store the containers in a cool, dry place, away from direct sunlight and moisture.
- Properly stored garlic powder, onion powder, and jalapeño powder can maintain their flavor for up to a year.
Creating your own garlic powder, onionCreating your own garlic powder, onionpowder, and jalapeño powder is a simple and rewarding process that allows you to enhance your culinary creations with intense flavors. By dehydrating the ingredients and grinding them in a coffee bean grinder, you can easily make these powders at home. Remember to select fresh ingredients, dehydrate them thoroughly, and store the powders properly to maintain their quality. Enjoy the convenience and vibrant flavors of your homemade spice powders in a variety of dishes, and experiment with different spice combinations to add your personal touch to your culinary creations.